(This Song’s Just) 76,482 Tiles Long
Last month, I assembled and uploaded a video showing a timelapse road trip from Pittsburgh, PA to San Mateo, CA. I’ve had a lot of requests from people (two, actually) who wanted to know how I managed to put the video together. So I’ll share the tricks and pitfalls I discovered in my work.
The location data came entirely from my friend Angelo. He ran the InstaMapper app on his iPhone for the majority of the trip. It ran sporadically during the first day, and it occasionally needed to be turned off throughout the journey so he could use the phone functions. But for a large part of the trip, it sampled the date/time, latitude, longitude, altitude, speed, and heading every 30 seconds. Each point was uploaded to InstaMapper’s servers, where friends and family could go online and track our progress in real-time.
Angelo put together a few map overlays and some graphs of our speed over time, but I thought I could do one better. So I asked him to export all the trip’s points in a CSV file, and set to work trying to pull something out of it. The data file looked like this:
...
2009-06-03 12:30:36,N 39.06617°,W 96.66934°,1014,66,268
2009-06-03 12:31:06,N 39.06549°,W 96.68029°,1014,73,266
2009-06-03 12:31:36,N 39.06484°,W 96.69175°,1033,70,264
2009-06-03 12:32:07,N 39.06393°,W 96.70280°,1053,73,262
2009-06-03 12:32:37,N 39.06283°,W 96.71413°,1082,73,262
...
And it continued in that fashion for 3,645 lines. As I was writing a PHP skeleton to read and loop over the data, it hit me: I should pass the points to Google’s Street View service, scrape the images, and put them all together into a timelapse video. At the time, I hadn’t planned any further than that. I didn’t know how the Street View site worked, I didn’t know if it was even technically possible to scrape the images in this way, and I wasn’t even sure if the data points were frequent or consistent enough to even make an intelligible video that didn’t just look like a mash of crap. In fact, I didn’t even know if Google had Street View tiles for a lot of these stretches of road. I mean, seriously, who needs to see what Route 40 in Kansas looks like?
Not knowing where else to start, I took a shot in the dark. I put one of the latitude/longitude pairs into Google Maps’ search box, opened Wireshark, and turned on Street View.
Right off the bat, I started to understand how it worked. The first request was for http://maps.google.com/cbk?output=xml&ll=<latitude>,<longitude>. After that, a bunch of requests went out for http://maps.google.com/cbk?output=tile&panoid=<stuff>&zoom=3&x=<num>&y=<num> as I panned the applet around and images loaded.
The first URL was easy to decipher. I simply had to take the latitude/longitude pair from each data point, convert it from the °N/S format into a pair of ± numbers, and substitute it into the URL. What came back looked something like this:
<panorama>
  <data_properties image_width="3328" image_height="1664" tile_width="512" tile_height="512" pano_id="AayUS0rw0WbPyJnkbJ8v1Q" num_zoom_levels="3" lat="38.878531" lng="-97.938661">
    <copyright>© 2009 Google</copyright>
    <text>I-70</text>
    <region>Madison, KS</region>
    <country>United States</country>
  </data_properties>
  <projection_properties projection_type="spherical" pano_yaw_deg="268.49" tilt_yaw_deg="33.20" tilt_pitch_deg="2.18"/>
  <annotation_properties>
    <link yaw_deg="88.36" pano_id="pyOJkOLMpadaGJviyoQbJw" road_argb="0x80f2bf24">
      <link_text>I-70</link_text>
    </link>
    <link yaw_deg="268.36" pano_id="WJiMEx8Zdbg7QlPS3sMsFw" road_argb="0x80f2bf24">
      <link_text>I-70</link_text>
    </link>
  </annotation_properties>
</panorama>
Things were looking good. I was able to get the name of the road, the city, state, and country easily from every data point. Another stroke of good fortune came in the form of the pano_id attribute, which turned out to be the single identifying name of every panorama in Google’s systems. And sure enough, the <stuff> I saw in my Wireshark capture turned out to be the pano_id from this response. Step 1 was complete.
As I went, I learned that if you have a latitude/longitude pair that Google doesn’t have Street View data for, it will return a much emptier XML tree. If I saw pano_id was missing, I just skipped over that point and went on to the next one.
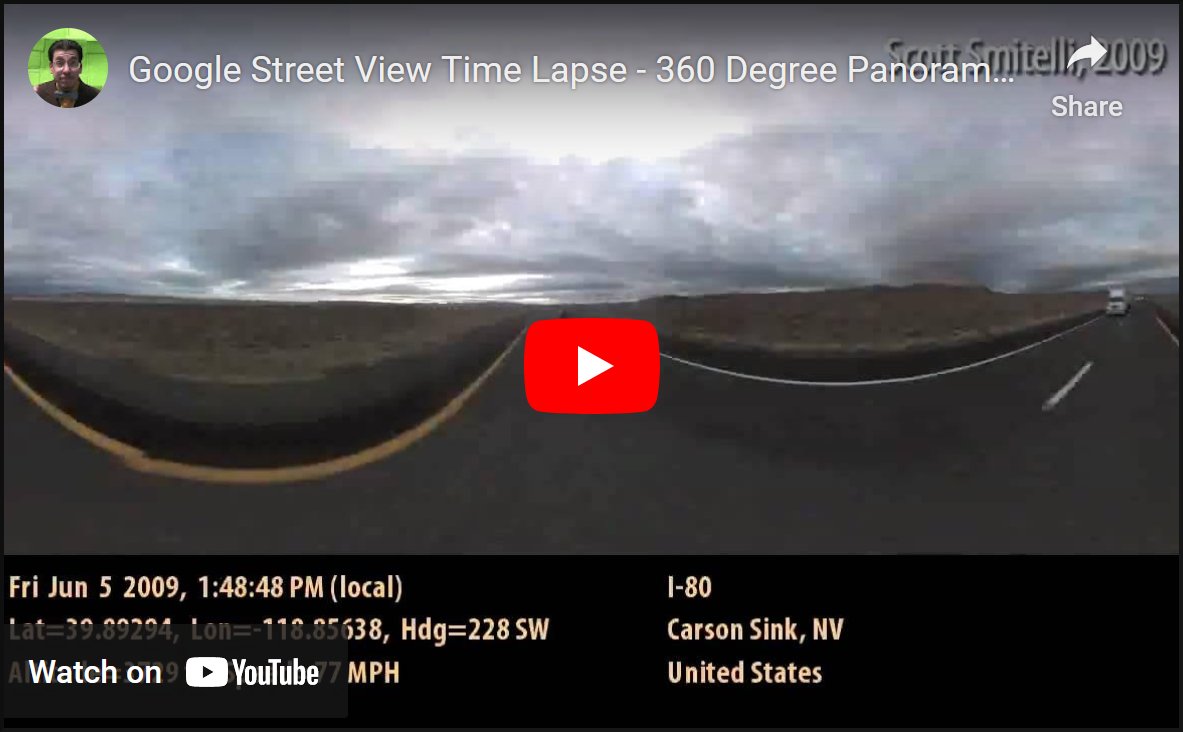
I turned my attention to the second URL. I knew the meaning of the panoid argument, but I was unsure what x and y were referring to. So I put zeros into both of them. What came back was a 512×512 pixel image containing nothing but sky. I tweaked x and y and realized that the panoramas are split up into square tiles. In this particular location, valid x values were 0 to 6. Valid y values were 0 to 2. Anything beyond that, and an image of solid black was returned. In total, the panorama was made of a 7×3 matrix of 512×512 images, for a grand total of 3584×1536. Loop through all the X and Y pairs, save the images to disk, and we have step 2. The zoom attribute seems to work well at 3. I haven’t found any points where a value ≥4 works, and zoom levels 1 and 2 make the image smaller (and consequently, use fewer tiles). I stuck with zoom level 3, figuring that since I was doing all this, I may as well do the hell out of it.
Because each “frame” of the video was in 21 pieces, it needed to be stitched together. I found the laziest solution to be the montage utility from ImageMagick. To save you some time, the syntax of the command is montage [file list] -tile 7x3 -geometry +0+0 output_file.jpg, where [file list] is a space-delimited list of the 21 images you want stitched. Make sure the source files are in the correct order, or you’ll get some wonky images out of it. There’s step 3.
I wrote the output files using sequential numbering, and left-padded with zeros. (0001, 0002, 0003, etc.) I opened QuickTime and loaded all the stitched JPEGs as an image sequence. When asked for a frame rate, I picked 24 to see how it would look. My laptop’s hard drive could barely stream the image data fast enough, but I started to see things come together. It was starting to look like a video! I resized the image sequence to 1280×548 and saved it into a QuickTime .mov file using the Photo JPEG compressor. (The frame size was set to match the width of a 1280×720 HD image, and to keep my 5,400 rpm hard drive from exploding. The 548 height was a consequence of the panorama’s inherent aspect ratio.) Step 4 was complete.
At this point, I was relatively happy. My video looked pretty good, albeit a little jumpy and erratic. But a lot of that came from Google’s own imagery—there wasn’t much I could do about that. And theoretically I could’ve smoothed the data, interpolated the missing points, etc… But I wanted to stay true to the data as we captured it. It seemed more authentic that way.
The shape of the image bugged me, though. It filled up a 720p frame just fine width-wise, but there were 172 vertical pixels that were completely unused. I didn’t just want to letterbox or crop it into 16:9… As I was watching it for the fifth time, it occurred to me that I had no idea where I was as I watched the video. I could tell when I entered a large city, but I couldn’t tell which city it was. I needed captions.
So I whipped up another PHP script to pull the street/city/state info out of Google’s XML, combine it with a human-readable summary of the GPS data, and output it using GD functions into a 1280×172 JPEG image. I made one of these images for every video frame, and combined them into a Photo JPEG QuickTime movie using the same steps as the panoramas. I guess I’ll call that step 5.
I took these two movie files, loaded them into Adobe Premiere (unfortunately the only video editor I had with me on the road) and combined them. From there, I saved the whole thing as MPEG-4, uploaded it to YouTube, and the rest is history. Is that even worth being called step 6?
The first thing I noticed about the video is the inconsistency in some of Google’s imagery. For example, some of the areas around Denver, CO seem to be captured at a lower detail level. The image is smaller, aligned to the upper left corner, with the right and bottom areas of the frame surrounded by black. This causes a distracting flicker in a few points. Likewise, there’s an area near Saline, MO where the images seem to have been captured in the dead of night. You can see headlights illuminating the road, as well as a huge amount of CCD noise which manifests itself as a colorful moiré pattern.
Another weird issue came about as a result of overpasses: Sometimes, a GPS point was captured just as we were driving under an overpass. The resulting street view panorama, at times, placed us on top of the overpass instead of driving beneath it. Likewise, sometimes the GPS is a little fuzzy, and it places us on a service road or some parallel street instead of the actual highway. I’m thinking this caused a few blank XML results.
In addition to that, I lamented the fact that the timestamps from InstaMapper’s CSV file are completely useless. It saves the time in the local format instead of UTC, and it doesn’t put the time zone anywhere in the data. Normally, this wouldn’t be a problem, because you could come up with some hack to work around it… Be it figuring out the time zone based on any backwards jump in time, or hammering on some geography website’s API to determine the time zone for a particular latitude/longitude pair. The real problem came from the fact that the iPhone’s clock is pretty unreliable when crossing time zone borders. I don’t know if it’s Apple’s fault or AT&T’s, but at times it took six hours and multiple reboots to get a time zone change to stick. In fact, when we went from Mountain to Pacific time, our iPhones actually went back to Central time for a little while! The timestamp that made it into the final video is simply whatever time the iPhone thought it was at the moment, as right or wrong as it may be.
Another gigantic issue occurred to me while I was generating the caption images… I never took into account the heading of the GPS data. I got the latitude and longitude, and the resulting video looked good enough based on that… Since the center of the image always faced straight down the road, I took for granted that the Street View car was driving the same direction we were. I later realized that, indeed, some of the panoramas were 180 degrees off. If you watch the clouds in the video, you’ll notice that at times they seem to change direction. It appears as though the projection_properties section of the XML contains critical information on how to properly center the image. This really complicates the stitching process, but it shouldn’t be insurmountable. It’s the sort of thing that would warrant a new revision of the video someday.
All in all, I’m proud of the way it all turned out. This basic idea could be expanded to generate automated trips down stretches of road, without being fed GPS points to follow. Without giving too much away, I will say that the <link ...> tags in the XML translate into the clickable road arrows that appear in the applet, and each link points to the pano_id directly before and after the panorama you’re looking at. In this video, I passed the first URL a set of latitude/longitude points for the ll= attribute… But you can provide a panoid= instead if that’s all you know. I’m not going to say any more about that. If you have the inclination, I’m sure you know how to put two and two together at this point.
Bear in mind that this is completely against Google’s terms of service. Not only is it an abuse of their (ample) bandwidth and machine power, but all these images are copyrighted. Having said that, I pulled down 3,645 XML files and over 76,000 image tiles in the course of a few hours, and they didn’t seem to care. But as always, your mileage will vary.
Keep on truckin'.
« Back to Articles